China Glaze – Escaping Reality

I think this might be the last one from my “old” batch of pictures before I cut all my nails down and went on hiatus.  But never fear, I’ve been busy making new ones!

Remember that movie Cirque du Soleil: Worlds Away that came out around Christmas of 2012?  Yeah, me neither.  But China Glaze apparently thought so highly of it that they did an entire full size collection devoted to it as a tie in.  Remember that 2012 holiday collection from China Glaze called Cirque du Soleil:  Worlds Away?  I do, but just barely and vaguely at that….

But, after brushing up on it in preparation for this post, it did have a couple of cool glitters that I liked.  But I find it physically impossible to pay full price for China Glaze (as reasonable as it is for a salon brand) and there were only a handful of cremes left when Sally finally got around to clearancing them.  So I ended up with two of them, a coral whose name escapes (ha!) me right now and this one.

Escaping Reality is a hot pink that borders on neon.  If it was a brighter or lighter shade it could very well go neon or fluorescent, but the pink is a darker blue leaning shade that saves it from being too loud and makes it much more wearable, rather than just being a “just for fun” choice.  I still classify it as a “hot” pink because it’s highly pigmented, plenty bright and not at all soft.

China Glaze Escaping Reality

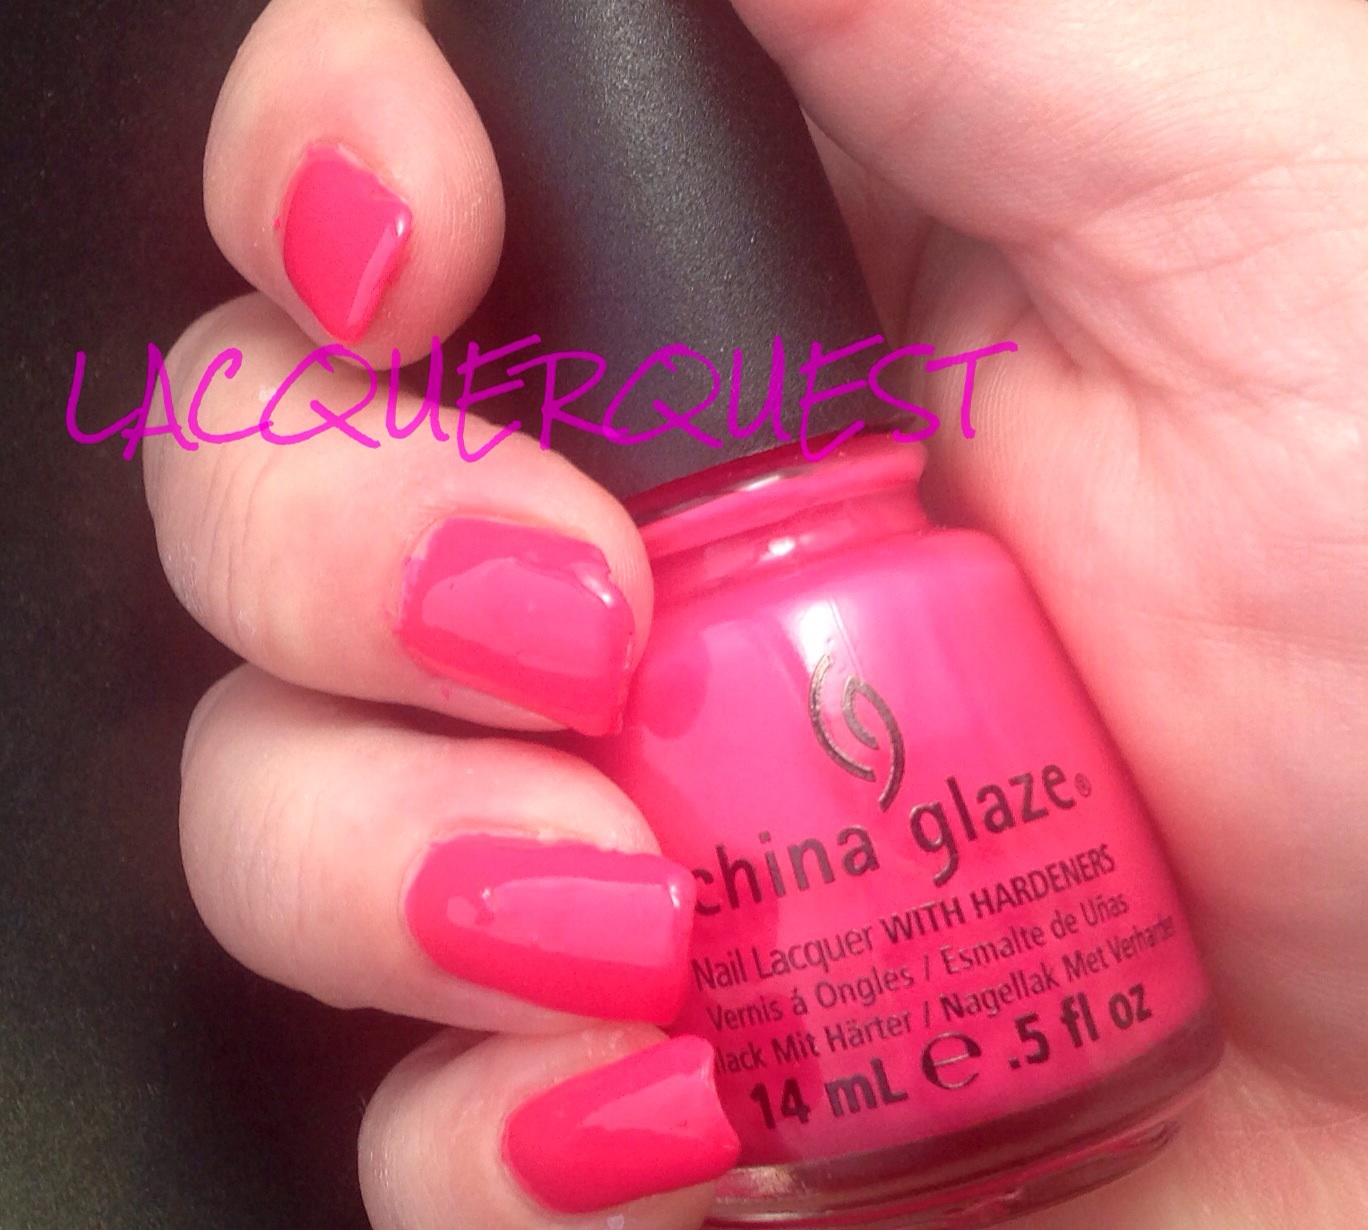
As far as the formula goes, it was a bit on the runny side for a creme but I didn’t have a problem with any cuticle flooding.  It wasn’t even necessarily that patchy but since I like to do three coats anyway, that doesn’t really work against a polish for me.  Unless it’s one of those that you’ve still trying to even out half a dozen coats into the thing!  While it wasn’t exactly a matte, there wasn’t much shine to it, but a coating of my precious Seche Vite fixed that up and left my nails looking creamy smooth and ultra shiny.

I also added an atrocious attempt at some tiger stripes at some point before I removed it.

China Glaze Fingerpaints Charcoal

Although I’m far from the best nail artist in the world, I can usually do a pretty decent animal print, so I don’t know why this is 1.  so amateurish and 2.  why I took a picture of it.  Since I’m holding a FingerPaints striper in the picture, I’m pretty sure that I’d just gotten the stripers and….. wait!  I do remember!  Sally was having a B2G1 sale on FingerPaints stripers and I got those at the same time as the two China Glaze polishes!  Since it was the first time I’d gotten the FingerPaints brand of stripers I was testing one out while sitting on the couch with just a shaded lamp for a light source while chatting away with my sister.  Now that I remember the circumstance, that striping job turned out pretty well!

The striper was Ch-art-coal Black and is a really nice one.  Granted, my only other stripers are Salon Perfects that sell for a buck or two at the drug store but FingerPaints are definitely my favorites.  The brush is very narrow, but really long with flexible bristles and a nice point so you can get really thin lines as easily as thicker ones.  The polish itself is thin enough for a light touch and good control, but not so runny that it will drip and spread.  It’s pretty much like a nice fluid eyeliner, it goes where you put it and not where you don’t.

Nail Art – Little Mermaid Party

This really isn’t nail “art”, but it best fits this category because it isn’t a review and the manicure was put together for a specific look and occasion.

The occasion was my niece’s first birthday party and it had a Little Mermaid theme.  I could have gone all fancy with iridescent fish scales and some black outlines, but I didn’t actually do it until the night before.  So the plan was to use the Mermaid colors of purple and teal with some of the same colored glitter and sparkles on top.  But did I have four different lacquers in the appropriate colors that would work together?  What a silly question….

Mermaid teal

Mermaid Belinda payton


The base color for the right hand was OPI’s Ski Teal We Drop, a dark teal creme from the Fall 2010 Swiss Collection topped with Art You Wondering, a turquoise/teal micro glitter in a clear base from FingerPaints.  This was also the accent nail on the left hand.

The left hand was two colors from the Zoya 2013 Zenith Holiday Collection.  The base was Belinda, a dark purple metallic while the topper was Payton, a jelly with a slight holo that was more of a violet purple.  The accent nail was teal, to match the other hand.

I really like how it turned out, so much so that I might use the same colors for a straight on manicure.  But I’m still going to get more advance notice for this year’s theme so I can top this one!


Nail Art – Easter Watercolor with OPI Sheer Tints

When I got the mini pack of the Sheer Tints, I wasn’t sure exactly what I was going to do with them.  Did that stop me from wanting them?  Ha!  I wasn’t really looking for anything at the time, but I was reading some reviews on them and saw some ideas at Phoenix Beauty Lounge.

I must say that I think I got more comments on this mani that I’ve ever had before.  Of course, I routinely get comments from women, especially at places like Sally or Ulta because people there are more likely to be into that kind of stuff.  But when the guy at Lowe’s notices them while cutting your PVC pipe, now that’s something!

I wasn’t completely happy with this one, but that was due to the crap job I did on the white polish (OPI Alpine Snow).  I loved how the Sheer Tint effects turned out, so I’m going to do it again some time, but use a different lacquer for my undies.  I’m thinking that one of my white jellies might be really nice and add even more delicacy to the look.  I pretty much just used the Alpine Snow so I could get it out of the way and check it off  of the review list.

It was really yucky, but I’m not laying all the blame on Alpine Snow’s doorstep.  Opaque creme whites are probably one of the toughest colors there is as far as getting a good formula.  If it’s not streaky, it’s globby, if it’s not runny, chalky.  This pretty  much had the consistency of Liquid Paper.  But I’m willing to cut it a little slack, because it’s a mini bottle that I’ve had a long time so that could have a great deal to do with it being gunky, as well as using the tiny brush.  And I’ll concede that it’s possible that there was some operator error involved as well.  I’ve used it before and, while I’ve never been really thrilled with it, I don’t recall it being this bad.

Here’s the tremendously bad picture I took for posterity:

image

Now to the good stuff!

I described the whole idea behind the Sheer Tints in my previous post, but I’ll put in the picture again just for a reference point on the colors.

image

From left to right –  I’m Never Amberrassed,  Be Magentale With Me, Don’t Violet Me Down and I Can Teal You Like Me.  Yeah, I know.  They  must stay awake at night thinking up this stuff…..

This was really easy and looks so much more impressive that it actually should.  The most frequent comment was “Did you do that yourself?” Followed closely by “Are those your real nails?”.  To which both of my answers are the same.  “If I was paying someone to do this, I would have made them redo the white base and if I was paying for fake nails they’d at least all be the same length!”  Well, that was the answer in my head.  My out loud answer was a very witty “Yes.”

I started with the white undies, which is basically like primering your walls so you have an even color when you paint them a different color.  Then, one by one, I just painted on streaks and strokes of each color, overlapping them to create even more colors.  I should have taken a photo before the top coat because, while it looked okay, it was when I put on the Seche Vite that the magic occurred.  Besides making them shine like crazy, it also blended the colors without muddying them, which was how I got the Monet effect.  Please ignore the raggedy edges, I did manage to smooth them out a little the next day before I inflicted them on an unsuspecting public….

image

The next picture is the bottle shot.  Yes, all of those different shades were created with just those four colors!

image

My verdict on the Sheer Tints is resoundingly positive!  Once my nails grow back (more on that later), I want to really play around with some different techniques and some monochromatic stuff.  At some point I’ll probably add an additional review showing how all of the colors look by themselves rather than blended.  I should have done that before, but didn’t think of it  until now and, honestly, I wouldn’t really have had the time lately anyway.